AI features
Create a project with the AI Project Wizard
Last updated 27 July 2026
The AI Project Wizard turns a short brief into a complete project plan. You pick a framework and a project type, tick the approvals your industry usually needs, answer two or three clarifying questions, then review every generated task before anything is saved. Start it from the sidebar: click + Create, choose Project, then Build with AI.
The wizard generates tasks and sub-tasks, links them with dependencies, adds milestones, and suggests an owner for each task. It is a quick way to get from an idea to a working Gantt chart, and a good starting point before refining the plan yourself or with the AI assistant.
What the wizard generates
The framework you choose shapes the structure of the plan, not just its labels:
- PMBOK organizes the work into the five PMBOK process groups, with kickoff and closeout milestones.
- PRINCE2 builds the plan as stages separated by Stage Gate milestones and includes the Project Initiation Document.
- Agile starts with a Sprint 0, plans delivery as sprints of two weeks each, and ends with a Release milestone.
- Not sure lets the AI pick the framework that best fits your brief.
The wizard also suggests a small set of owners and assigns them to tasks. This is the one AI surface in Ganttastic that assigns owners: the AI assistant cannot set assignees from chat.
Start the wizard
- In the sidebar, click + Create, then Project. The Create New Project dialog opens.
- Choose the Build with AI card (the alternative is Start Blank). The card shows your AI capacity: a usage bar, the number of AI plans you have used this month, and your reset date.
Build with AI is disabled when you have reached your active project cap, when you are close to your monthly token allowance, or when an Enterprise admin has switched AI off for the whole organization. Each case shows its own message on the card.
Fill in the project details
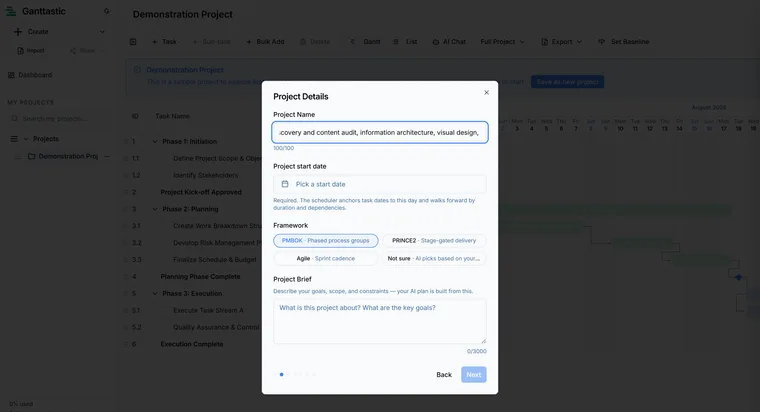
The Project Details step asks for four things:
- Project Name (required, up to 100 characters).
- Project start date (required). The scheduler anchors task dates to this day.
- Framework: PMBOK, PRINCE2, Agile, or Not sure.
- Project Brief (optional at this step, up to 3000 characters).
Pick a project type
The Project Type step shows six cards: IT / Software, Construction, Marketing Campaign, Event Planning, Business Operations, and Custom / Other.
Once you pick a card, a required row of pills appears on the same step. Its label depends on the type: Methodology for IT / Software, Delivery model for Construction, Campaign type for Marketing Campaign, Event type for Event Planning, and Focus area for Business Operations. Every list ends with an Other pill that opens a text box where you type your own. You cannot continue until you have picked a pill or typed your own option.
Tick common considerations
The Common Considerations step lists approval gates and workstreams that plans in your industry often miss. An IT / Software project offers items like CAB (Change Advisory Board) approval, Security sign-off / penetration test, and Privacy Impact Assessment (PIA). A Construction project offers council permits, an environmental impact assessment, and a WHS induction. Each type has its own short list.
Everything you tick becomes explicit milestones and tasks in the generated plan, so external approvals get scheduled from day one instead of surfacing late.
Answer the scope questions
The Scope & Details step shows two or three clarifying questions the AI wrote for your specific project, each with an example answer as its placeholder. All questions must be answered before you can continue. If your brief mentions a phase count that conflicts with the framework you picked, one of the questions asks you to settle it.
- Answer each question in a sentence or two.
- Click Generate Plan.
- The Building Your Plan screen shows progress while the AI writes your plan.
Review your plan
The Review Your Plan step lists every generated task and milestone. Before you commit you can:
- Untick the checkbox on any task to leave it out. A counter shows how many tasks are selected.
- Click a task name to rename it inline.
- Use the milestone toggle (Mark as milestone) to convert a task to a milestone or back.
- Delete tasks you do not want in the plan at all.
Do not refresh or leave the page here. The plan is not saved until you click Create Project, and your AI usage has already been counted. The dialog ignores Esc and outside clicks at this step so you cannot lose the plan by accident.
When the list looks right, click Create Project.
After the plan is created
A success screen sums up the result with chips for phases, tasks, milestones, approximate duration in weeks, and the framework used. It offers two next steps:
- Chat with AI to refine opens the AI assistant with refinement prompts ready to go.
- View on the Gantt closes the wizard so you can start working with the tasks directly.
Monthly limits
Wizard generations are limited per monthly cycle by plan:
| Plan | AI plans per month |
|---|---|
| Team Member (free) | 1 |
| Project Coordinator | 2 |
| Project Manager | Unlimited |
Every generation also draws from your shared monthly token allowance, the same pool used by every AI feature. Once you have used 90% of your tokens you cannot start a new generation until the allowance resets on your billing anniversary (or on your account creation day on the free plan). See plans and pricing for the full comparison.
Easier to try than to read about.
Open Ganttastic in your browser and follow along. No account needed.