Get started
Your first project
Last updated 27 July 2026
This page walks you through building your first project in Ganttastic: create it, set the work calendar, add phases as tasks, break them into sub-tasks, link them with dependencies, mark key dates as milestones, and record progress. By the end you have a working Gantt chart that reschedules itself as your plan changes.
You need a project open in the app to follow along. If you have not signed up yet, see create your account, or try Ganttastic without an account first.
Ways to start a project
Ganttastic gives you several starting points. Pick the one that matches what you have:
- Start Blank: build the schedule yourself from an empty project. The rest of this page follows this path.
- Build with AI: describe the project and let the AI Project Wizard draft the tasks, dates, and dependencies for you.
- Import: click Import in the sidebar to bring in a .gwise or JSON file from another Ganttastic account, a Microsoft Project XML or MPP file, or a CSV, XLS, or XLSX export from tools such as Asana, Monday, or ClickUp. See import a project.
- Duplicate: right-click an existing project in the sidebar (or open its ... menu) and choose Duplicate to reuse its structure.
- New from template: enterprise members can start from an organization template or a personal one with New from template in the Create menu. See enterprise.
See plans and pricing for the full comparison.
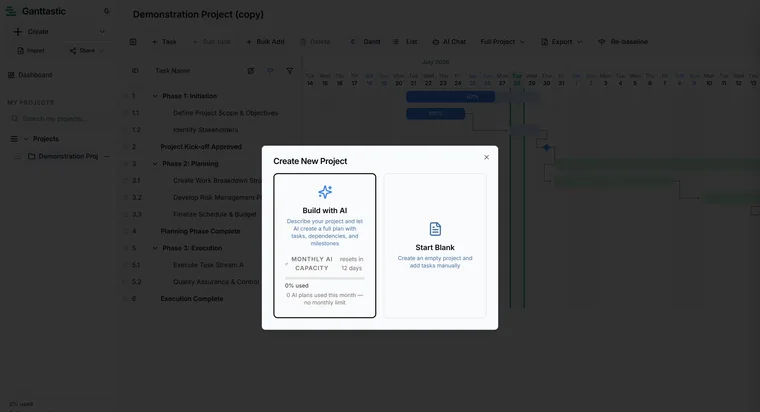
Create a blank project
- Click Create in the sidebar and choose Project. The Create New Project dialog opens with two cards, Build with AI and Start Blank.
- Click Start Blank. A project name field appears in the same dialog.
- Type a name of up to 100 characters. A live counter shows how many you have used.
- Click Create. A "Project Created" toast confirms that your new project is ready, and the empty project opens.
If you are working as a guest, the project is saved locally in your browser, and the toast reminds you to sign up to keep it safe.
Set up project settings first
A few minutes in settings saves rework later, because the work calendar drives every duration and dependency calculation. Right-click your project in the sidebar (or open its ... menu) and choose Settings to open the Project Settings dialog. It has three tabs:
- Display: the project description, Project Start Date, Date Format, First Day of Week, and two Gantt bar label switches, Show Task Names on Gantt Bar and Show Progress on Gantt Bar.
- Work Calendar: tick the working days of the week (Monday to Friday by default), define working hours with Add Time Block, and record closures under Holidays & Non-Working Days with Add Holiday.
- Resources: click Add Resource and enter a Name, a Type (Internal or External), a Role, and a Company / Department. You assign these people and teams to tasks later.
Click Save changes when you are done.
Add your phases as tasks
Start broad. Add each major phase of the work as a task, then break the phases down in the next step.
- Click + Task in the toolbar (or press Insert). A row named "New Task" is added at the bottom of the list, and the Task Details panel opens on it automatically.
- Rename it in the panel's Task Name field, then set rough Start and End dates with the date pickers.
- Close the panel and repeat for each phase. Four to eight phases is a comfortable size for a first pass.
You can also rename without the panel: double-click the task name in the Gantt table to edit it in place, or edit it directly in List view, where names are always editable. Dates can also be set by dragging bars on the chart. Tasks number themselves automatically, starting at 1, and the numbering updates as you reorder.
The full task toolkit, including Bulk Add and the right-click menu, is covered in working with tasks.
Break phases into sub-tasks
- Select a phase with a single click. The + Sub-task button becomes active.
- Click + Sub-task. An indented row appears under the phase, numbered 1.1, 1.2, and so on, and the Task Details panel opens on it.
- Rename it and set its dates, the same as any task.
You can also right-click a task and use the Add submenu, which offers New Task and New Sub-task. Ganttastic supports one level of nesting: tasks and their sub-tasks.
As soon as a task has sub-tasks it becomes a summary row. Its start becomes the earliest sub-task start, its finish the latest sub-task finish, and its progress a rollup, so those fields turn read only in the panel with a "Rolled up from subtasks." note.
Link tasks with dependencies
Dependencies tell Ganttastic the order of work, so when one task moves, everything downstream reschedules automatically. The quickest way to add one:
- Right-click the task that must wait, and choose Manage Dependencies, then Add Dependency...
- Pick the predecessor in the searchable picker. A finish to start link is created and an arrow appears on the chart.
Three other ways do the same job:
- Drag the circular dependency handle on a Gantt bar and drop it on another bar.
- Use the Add Dependency button on the Dependencies & Notes tab of the Task Details panel.
- Type an expression into the Predecessors column in List view and press Enter.
The typed syntax gives you full control over link types and lag:
| You type | What it means |
|---|---|
2 | Finish to start: this task begins after task 2 finishes |
2, 3 | Two predecessors, both finish to start |
3:SS | Start to start with task 3 |
2:FS+2 | Finish to start with a lag of 2 working days |
4:FF-1 | Finish to finish with a lead of 1 working day |
Ganttastic rejects circular dependencies with a "Circular Dependency" warning rather than applying them. When an edit cascades and reschedules downstream tasks, a toast summarizes what moved and offers a one click Undo for 15 seconds. For link types, lag, and auto-scheduling in depth, see dependencies, milestones, and auto-scheduling.
Mark key dates as milestones
A milestone is a point in time rather than a span of work. It has no duration and draws as a diamond on the chart. Use milestones for approvals, launch dates, and other fixed deadlines. There are exactly two ways to create one:
- Right-click a task and choose Convert to Milestone.
- Open the Task Details panel and tick the Milestone checkbox on the General tab.
Giving a task the same start and finish date does not convert it; it stays an ordinary task until you use one of the two controls above. To change a milestone back, right-click it and choose Convert to Task, or untick the checkbox.
Record progress
Progress lives on each task as a percentage. Update it in whichever view you are in:
- Right-click a task, choose Set Progress %, and pick 0%, 25%, 50%, 75%, or 100%. In the Gantt view the submenu also has Custom... for any value.
- Type into the Progress (%) field on the panel's General tab.
- Edit the % Complete column directly in List view.
Phases with sub-tasks calculate their own progress as a rollup of their sub-tasks, weighted by duration. Team members can update every task assigned to them across projects from the My Tasks view, without opening each project. See views and navigation.
When the plan looks right, capture it with Set Baseline so you can measure schedule changes against the original later. See baselines and variance.
Easier to try than to read about.
Open Ganttastic in your browser and follow along. No account needed.