Plan and schedule
Working with tasks
Last updated 27 July 2026
Tasks are the rows of your Ganttastic project. This page covers every way to add and edit them: the toolbar buttons, List view columns, the Task Details panel, Bulk Add for many rows at once, the right-click menu, drag-and-drop scheduling, duplicating, sub-tasks, colors, status, and undo.
Every task carries a name, start and finish dates, a duration, and a progress percentage, plus optional resources, a color, a status, predecessors, and notes. If you are building a schedule for the first time, your first project walks through the workflow end to end; this page is the reference.
Add tasks and sub-tasks
The toolbar has three add controls when a project is open:
- + Task creates a row named "New Task" at the end of the task list and opens the Task Details panel on it. Pressing Insert does the same.
- + Sub-task is active only while a task is selected. It adds an indented sub-task under the selection and opens the panel on it. Ganttastic supports one level of sub-tasks.
- Bulk Add creates many rows at once (covered below).
Right-click any row for the Add submenu: New Task appends a task at the end of the list (not at the clicked position), and New Sub-task adds a sub-task under the clicked task. Right-clicking empty chart space offers New Task Here, which creates a task starting at the date you clicked.
Selection and clicks work like this:
- A single click selects a row. Ctrl+click (Cmd+click on Mac) adds rows to the selection, and Ctrl+A selects everything.
- A double-click on a row or bar opens the Task Details panel. Double-clicking directly on the task name in the Gantt table renames it in place instead; in List view, names are always editable.
- A right-click selects the row and opens the context menu.
Columns in List view
List view shows your tasks as an editable table with ten columns:
| Column | What it holds |
|---|---|
| ID | Automatic number (2 for a task, 2.1 for a sub-task). Read only. |
| Task Name | The name, editable in place. |
| Duration | Working days, in steps of 0.25. Non-working days are excluded. |
| Start | When the task begins. |
| Finish | When the task ends. |
| % Complete | Progress from 0 to 100. Parent rows aggregate their sub-tasks. |
| Resource Names | Who is assigned to the task. |
| Status | Free text, such as On track or Blocked. |
| Predecessors | The dependency expression, typed directly into the cell. |
| Notes | Free notes. The Task Details panel labels this field Description. |
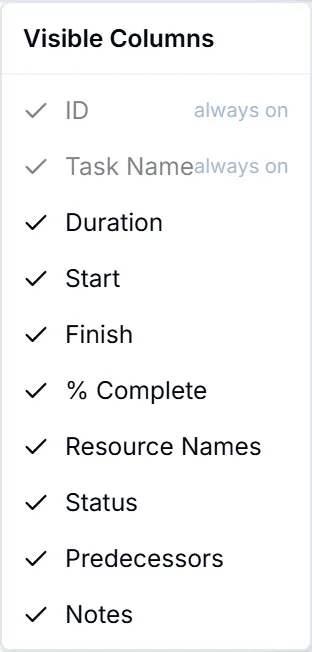
To choose which columns display, click the Columns button above the table, or right-click the header row to open the Visible Columns menu. ID and Task Name are always shown; the other eight can be hidden. Your choices are saved per project.
The Task Details panel
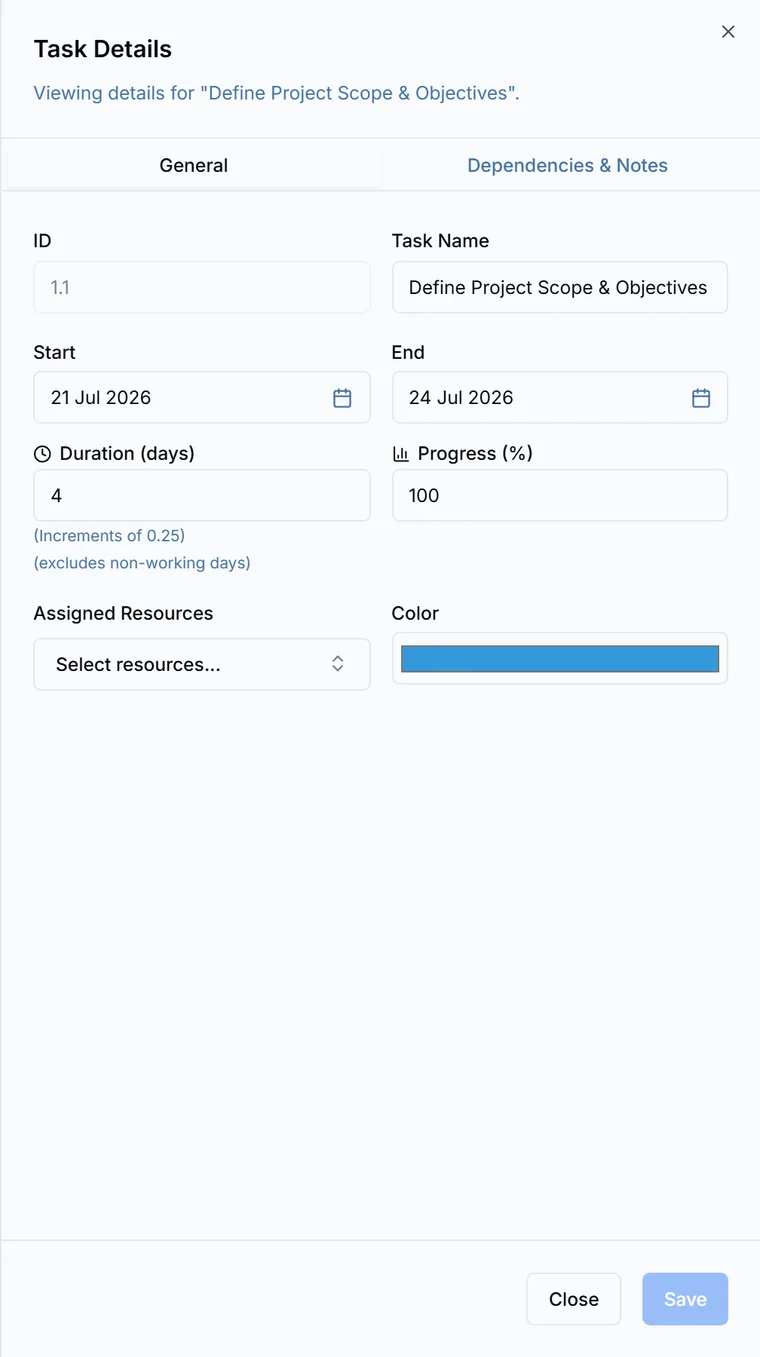
Double-click a task, or right-click it and choose Edit Task, to open the Task Details panel. It slides in from the right and has two tabs.
The General tab holds the core fields:
- ID (read only) and Task Name. A task name cannot be blank; emptying it is rejected with a "Task name required" message.
- Start and End with calendar pickers (typed dates work too), and Duration in working days, in increments of 0.25.
- Progress (%).
- The Milestone checkbox, shown for top-level tasks only.
- Assigned Resources, a searchable picker that accepts several resources. Its Add New Resource entry opens Project Settings on the Resources tab without closing the panel, and the new resource appears in the list right away.
- Color, the bar color picker.
The Dependencies & Notes tab has the dependency expression field with an Add Dependency picker button, plus a Description field for notes, capped at 4,000 characters with a live counter.
Edits commit when you leave a field. The footer's Save button enables while changes are pending, and Close (or the X, or a click outside the panel) closes it; a warning guards unsaved changes. On a task with sub-tasks, Start, End, Duration, and Progress are disabled and marked "Rolled up from subtasks."
Bulk Add many tasks at once
Bulk Add sits in the toolbar in both Gantt and List views, and there is no plan restriction: anyone who can edit the project can use it, including free accounts and guests on their own projects.
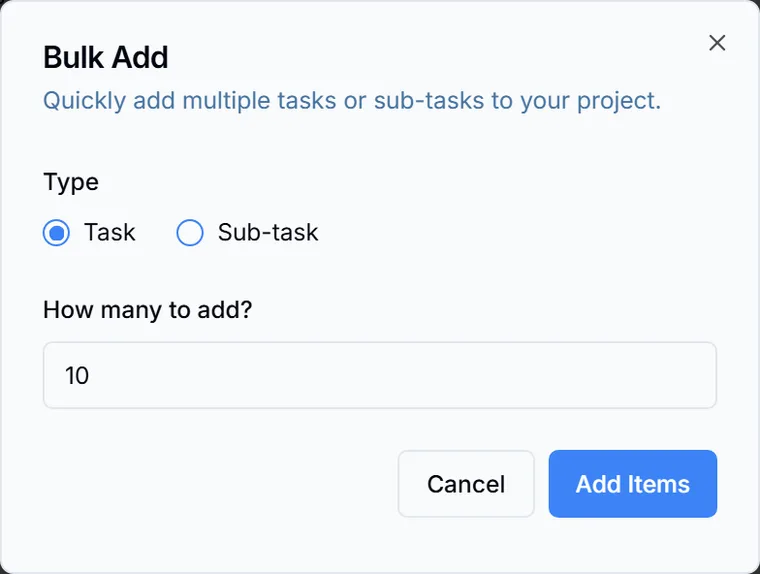
- Click Bulk Add.
- Choose Task or Sub-task.
- Set How many to add? (10 by default, up to 100 per batch).
- For sub-tasks, enter the Parent Task ID. This field is required, and it only appears when you pick Sub-task.
- Click Add Items.
The new rows arrive named in sequence ("New Task 4", "New Task 5", and so on), ready to rename in place.
The right-click menu
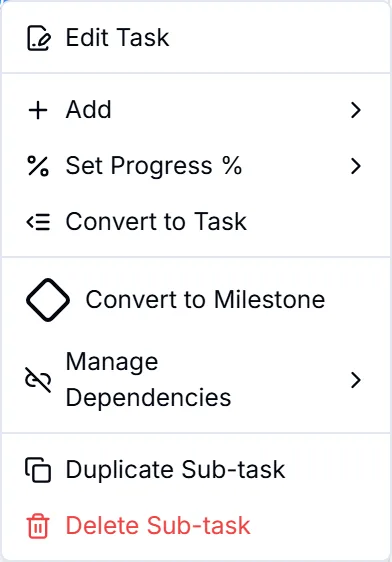
Right-click a task in either view for its context menu:
- Edit Task opens the Task Details panel.
- Add holds New Task and New Sub-task, described above.
- Set Progress % offers 0%, 25%, 50%, 75%, and 100%; the Gantt view adds Custom... for any value. This item is not offered on tasks with sub-tasks, whose progress rolls up automatically.
- Convert to Sub-task... (Gantt view only, for top-level tasks without children) opens a picker to choose the new parent. On sub-tasks the menu shows Convert to Task instead, which promotes the row to the top level.
- Convert to Milestone turns the task into a milestone; on a milestone it reads Convert to Task. See dependencies, milestones, and auto-scheduling.
- Manage Dependencies holds Add Dependency..., a searchable picker that creates a finish to start link, and a Remove entry for each existing link. Link types and lag are set with the text syntax in the Predecessors column or the panel.
- Duplicate Task copies the task (next section).
- Delete Task, shown in red, removes the task and all of its sub-tasks after a confirmation dialog. The toolbar Delete button and the Delete key do the same for the current selection.
Duplicate a task
Right-click a task and choose Duplicate Task. The copy behaves like this:
- It is appended at the bottom of the task list, not placed under the original.
- It takes the original's name plus a suffix, so "Design" becomes "Design (Copy)".
- Sub-tasks are copied along with it.
- Dependency links are stripped from the copy, so re-enter any predecessors it should keep.
Drag and drop
Most schedule edits are quicker with the mouse:
- Drag a bar left or right to shift the whole task.
- Drag either end of a bar to change its start or finish, which changes its duration.
- Drag a row by its grip handle to reorder the list, in either view.
- Drop a row onto another task to make it that task's sub-task.
- Drag the circular handle on a bar and release it on another bar to create a dependency.
Sub-tasks and summary rows
Ganttastic supports tasks and one level of sub-tasks. Sub-tasks of task 2 are numbered 2.1, 2.2, and so on.
A task with sub-tasks becomes a summary row. Its start is the earliest sub-task start, its finish is the latest sub-task finish, and its progress is the average of its sub-tasks weighted by duration. You cannot edit these values directly; the panel disables them and shows "Rolled up from subtasks."
To restructure, drag a row onto a task to make it a sub-task, or use Convert to Sub-task... in the Gantt view menu. Convert to Task promotes a sub-task back to the top level.
Task colors
Each task can have its own bar color. Open the Task Details panel and use the Color picker on the General tab. New tasks start with the default blue. Color is set per task, so you can shade bars by phase or by team to make the chart read at a glance.
Task status
The Status column in List view is free text. Type whatever fits your workflow, for example On track, At risk, Blocked, or Done. Status has no effect on scheduling; it is a label for people.
Status also shows up beyond the table:
- The AI assistant reads task status when it answers questions about the project or writes summaries.
- PNG and PDF exports can include Status as an optional column, and .gwise files carry it in full. The Excel export does not include a Status column. See export your project.
Undo and redo
Press Ctrl+Z (Cmd+Z on Mac) to undo and Ctrl+Y or Ctrl+Shift+Z to redo. A toast names each change as it is reversed or restored, for example "Undo: Add task".
History is kept per project for your current session only. Once you leave or reload the page, it is cleared, which is why Delete Task asks for confirmation first.
Two behaviors worth knowing:
- When a dependency edit reschedules downstream tasks, a toast summarizes the cascade and offers a one click Undo for 15 seconds.
- Changes made by the AI assistant join the same history, so you can undo an AI edit, and redo it, just like your own.
Easier to try than to read about.
Open Ganttastic in your browser and follow along. No account needed.